Move Over Digital Gold, Doge is Going Literal Bronze.
Happy Birthday Doge! Kabosu, the Shiba Inu dog behind the world’s most iconic meme — The Doge — is turning 17 on November 2nd. Let’s help Kabosu (The Doge) be remembered forever! We are calling on all who love The Doge to come together to help create a bronze Kabosu statue in her hometown of Sakura, Japan for her birthday!
Over the years, Kabosu and her mama, Atsuko, have enjoyed regular walks through Sakura Furusato Hiroba, a unique park featuring seasonal flowers and a Dutch windmill. It’s about time this sacred place is adorned with Kabosu’s bronze likeness, bringing great fortune to flower fans and memelords alike.
The Sakura City officials are planning a park renovation, providing the perfect opportunity to put this Doge statue onto the blueprint, unveiling it in 2024.
The fundraiser campaign is making a $10,000 donation towards park renovations. The statue itself will cost an estimated $32,069 (😉), including podium, transportation and installation costs. It’s an ambitious goal, but she’s worth it!
Let’s rally the Doge community to meme this dream into reality!
The “Bronze The Doge” fundraiser campaign will run from November 2nd (Kabosu’s birthday) through December 6th (dogecoin’s birthday). We need all paws on deck to make this Dogely dream a reality, and there are many ways to contribute to this epic moment in Doge History. At the end of the campaign, all donations will be converted into dollars and the leaderboard will be finalized (based on the value of each donation at the end of the campaign). Be sure to follow the leaderboard as the campaign progresses!
Donate $DOG, $ETH, or $USDC directly to the campaign FUNdraiser’s multi-signature wallet by navigating to bronzethedoge.xyz & clicking the “Donate” button or send directly to the multi-sig at: bronzethedoge.eth or 0x633aC73fB70247257E0c3A1142278235aFa358ac.
Donate in dogecoin through the Dogecoin Foundation’s Bronze The Doge website or send DOGE directly to the FUNdraising address: D8HjKf37rF3Ho7tjwe17MPN8xQ2UbHSUhB
Tip DOGE on Twitter using MyDoge’s tipping feature by tweeting @BronzeTheDoge, e.g “”.
Use Rainbow Wallet from Nov 2nd to Nov 16th, to swap for $DOG ($DOG = tokens representing a piece of the fractionalized original Doge Meme). All fees from swaps performed for $DOG will be donated to Bronzing The Doge. Download Rainbow wallet for iOS or Android to donate swap fees.
Who is organizing this campaign?
This campaign is being spearheaded by the Dogecoin Foundation and PleasrDAO (OwnTheDoge.com), with assistance from MyDoge, Doge Pound, Feisty Doge, Rainbow and other friends and admirers of Kabosu the Doge and Shiba Inus everywhere.
We call upon all additional organizations who innovate in the Doge ecosystem and believe in the Doge to concoct creative FUNdraising strategies to join this community effort to Bronze The Doge.
Beyond the organizations, we call on all NFT collectors, web3 inhabitants, degens, Reddit lurkers, general memelords, Tesla owners, etc to contribute and share this campaign far and wide.
Our dream is for the worldwide Doge community to unite in creating a symbol of hope and happiness that will endure for generations to come!
The Rewards!
In addition to being able to tell your great great grandchildren how you helped Bronze The Doge, there are a number of rewards for your contribution.
The top 11 Donors will have their ENS or Dogecoin Wallet Address engraved on the Doge Statue plaque and immortalized for all time (Family Friendly ENS names only).
All Donors who contribute at least $11 will have their ENS or Wallet Address added to a global registry that will be made into an NFT that lists all the individuals, communities, and organizations who joined together to meme this dream into reality. This will give all contributors the ability to show they were part of this monumental moment in Doge history.
Everyone who swaps for $DOG or donates to Bronzing The Doge directly using Rainbow wallet from Nov 2nd to Nov 16th will receive a Doge wallet icon and a chance to win a Pixel of the original Doge Meme!*
You, when you donate and get rewards.
What Happens If It Doesn’t Happen?
We expect the goal of $42,069 will be surpassed with gusto, but sure, fair question.
If for whatever reason, the target isn’t reached by the end of the campaign, OwnTheDoge will look to fill the gap, to ensure Kabosu gets the chance to see her reflection in a shiny bronzed visage.
If disaster strikes and for whatever reason the statue cannot be built/erected in 2024 as planned, or if there are left over FUNds, we will partner with Atsuko Sato to allocate any potential excess donations we receive to charitable causes such as animal rescue, service animals, or related causes.
And What Happens If It Happens Too Much?
That’s more like it! If we rocket past our goal of $42,069, we will MAKE THE STATUE BIGGER AND BIGGER!
Much giant
That’s right! The more FUNds we receive, THE BIGGER THE DOGE!!! The size of the Doge statue will increase in direct correlation with the amount raised beyond the initial target. We’ll only run into problems if the GameStop degens pump this campaign FUNdraiser and we end up with a statue that’s bigger than the park. But that would be a great problem to have, and would most certainly add a whole lot of WOW to the world.
Any FUNds left over after the statue has been installed will be donated to a fund for ongoing statue and park maintenance and/or donated with input from Atsuko.
In regard to donation wallet security, the custodians of the multi-signature wallet are seven veteran members of the Doge community listed in the graphic below.
Multi-sig Custodians
The Dogecoin wallet was securely generated offline and has been stored redundantly and securely.
Don’t let this opportunity to be part of the most monumental moment in Doge history pass you by! Help make Kabosu’s 17th birthday one for the ages, and ensure the world’s most famous meme lives forever.
Be sure to follow @BronzeTheDoge, @OwnTheDoge, @DogecoinFdn, @Dogecoin, @Dogecoin_Devs, @PleasrDAO, @rainbowdotme, @TheDogePoundNFT, @NFDtoken, and @kabosumama on twitter, and to use #BronzeTheDoge in all tweets and memes regarding Kabosu’s birthday or the FUNdraising campaign to Bronze The Doge! We need the collective voice of all Doge communities to help create the most monumental statue in all of history! Such Profundity! @doughwallet
OFFICIAL LINKS
Bronze the Doge FUNdraiser Campaign Website: bronzethedoge.xyz
The Campaign Multi-Sig Wallet: 0x633aC73fB70247257E0c3A1142278235aFa358ac
Dogecoin Foundation Bronze the Doge Campaign Website: dogecoin.com/happy-birthday-kabosu-bronzethedoge
*$DOG tokens represent units of the fractionalized original Doge meme, which was minted as an NFT and sold at auction by Atsuko Sato to PleasrDAO, now known as @OwnTheDoge. Also, you can lock $DOG in The Pixel Portal, and get an NFT in return: an actual Pixel from the actual Doge meme, verified on chain!
The acquisition of Twitter by Tesla CEO and billionaire Elon Musk has seen 62% of Dogecoin (DOGE) investors turn a profit, amid speculation that the acquisition will bring positive value to the meme token.
On October 26, the price of DOGE increased after billionaire entrepreneur Elon Musk updated his Twitter bio to “Chief of Twit,” and on the same day, he visited Twitter’s headquarters in San Francisco before officially acquiring the company on October 28 as owner. the new one.
Dogecoin Rise
In the past week, according to CoinGecko, DOGE’s price has increased by 98.5% to reach $0.120 at the time of writing.
This means that as many as 62% of DOGE holders are “Making Money at Current Prices,” according to data from blockchain intelligence platform IntoTheBlock.
This number even surpasses Bitcoin (BTC) and Ethereum (ETH) holders, who have 54% and 57% holdings, respectively.
The event also triggered DOGE’s market cap to surpass smart contract platforms Cardano and Solana to become the 8th largest cryptocurrency in the world with a market cap of $16.3 billion, according to CoinGecko.
Given that many Dogecoin investors have high hopes for Musk, also known as “The Dogefather,” to integrate Dogecoin into Twitter in some way or another, the connection between Musk’s purchase of Twitter and the massive increase in DOGE’s price shouldn’t come as much of a surprise.
Desire to integrate Dogecoin into Twitter
Several DOGE fans expressed their desire for Dogecoin integration into Twitter, such as tipping and more:
Tesla accepts Dogecoin
By December 2021, Musk was of the view that Dogecoin was “more suitable for transactions.” Then in January 2022, Tesla began accepting DOGE as a payment method for purchasing merchandise, and Musk hinted at doing the same at SpaceX in May. 2022.
Shiba Inu and Dogecoin are two cryptocurrencies that have witnessed a significant rise in popularity and growth in recent months.
Each token is based on a joke and classified as a meme-based token, although they are widely used and have developed their entire ecosystems of their own.
Dogecoin and Shiba Inu will be accepted as payment methods by Gucci, according to a story in Vogue Business.
In SHIB: The Metaverse, we saw how Shiba Inu acquired the new use-case of purchasing land. Buterin even updated the Shiba Inu Covid-19 relief fund, which is providing him $100 million in compensation.
According to the BIG3, the elite worldwide league, co-founder of Craft Ventures Bill Lee purchased 25 Fire Tier Editions of Aliens using Dogecoin on May 4.
Is Dogecoin (DOGE) a good investment opportunity for you?
The value of Dogecoin (DOGE) on May 5, 2022, was $0.1347. “
At $0.731578 on May 8, 2021, Dogecoin (DOGE) was at its all-time high point. In other words, DOGE was worth $443 percent more at its all-time high than it was at the time of the ATH.
On April 6, Dogecoin (DOGE) achieved a high of $0.1729, according to the token’s performance during the preceding month.
On April 25, the value of the token fell to a low point of $0.1243. We can observe that the token’s value dropped by $0.0486, or 28 percent, in this example.
However, between April 25 to May 5, the token’s value increased by $0.0104, or 8 percent. We may predict DOGE to hit $0.2 before the end of May, giving it a good investment opportunity.
Is Shiba Inu (SHIB) a good investment?
0.00002156 Shiba Inu (SHIB) were born on May 5, 2022.
SHIB (Shiba Inu) hit its all-time high on October 28, 2021, when it traded for $0.00008616. At its all-time peak, the token was worth 299 percent more, or $0.0000646.
Looking at Shiba Inu (SHIBperformance )’s during the last month, the token’s value peaked at $0.00002817 on April 12.
However, on April 309, the token dropped to a value of $0.00002157, which was the lowest point. We can notice a drop of $0.0000066, or 23%, in this example.
As a result, SHIB is more valuable than ever, with a potential price increase of $0.00003 by the end of May.
Unlike other iOS wallets, doughwallet is a real standalone dogecoin client. There is no server to get hacked or go down, so you can always access your money. Using SPV mode, doughwallet connects directly to the dogecoin network with the fast performance you need on a mobile device.
The Next Step in Wallet Security
doughwallet is designed to protect you from malware, browser security holes, even physical theft. With AES hardware encryption, app sandboxing, keychain and code signatures, doughwallet represents a significant security advance over web and desktop wallets, and other mobile platforms.
Beautiful Simplicity
Simplicity is doughwallets core design principle. A simple backup phrase is all you need to restore your wallet on another device if yours is ever lost or broken. Because doughwallet is “deterministic”, your balance and transaction history can be recovered from just your backup phrase.
Features:
– “simplified payment verification” for fast mobile performance – no server to get hacked or go down – single backup phrase that works forever – private keys never leave your device – import password protected paper wallets – open source – “payment protocol” payee identity certification
A full node is a program that fully validates transactions and blocks. Almost all full nodes also help the network by accepting transactions and blocks from other full nodes, validating those transactions and blocks, and then relaying them to further full nodes.
Most full nodes also serve lightweight clients by allowing them to transmit their transactions to the network and by notifying them when a transaction affects their wallet. If not enough nodes perform this function, clients won’t be able to connect through the peer-to-peer network—they’ll have to use centralized services instead.
Many people and organizations volunteer to run full nodes using spare computing and bandwidth resources—but more volunteers are needed to allow Dogecoin to continue to grow. This document describes how you can help and what helping will cost you.
Costs And Warnings
Running a Dogecoin full node comes with certain costs and can expose you to certain risks. This section will explain those costs and risks so you can decide whether you’re able to help the network.
Special Cases
Miners, businesses, and privacy-conscious users rely on particular behavior from the full nodes they use, so they will often run their own full nodes and take special safety precautions. This document does not cover those precautions—it only describes running a full node to help support the Dogecoin network in general.
Secure Your Wallet
It’s possible and safe to run a full node to support the network and use its wallet to store your Dogecoins, but you must take the same precautions you would when using any Dogecoin wallet. Please see the dogecoin core guide for more information.
Minimum Requirements
Dogecoin Core full nodes have certain requirements. If you try running a node on weak hardware, it may work—but you’ll likely spend more time dealing with issues. If you can meet the following requirements, you’ll have an easy-to-use node.
Desktop or laptop hardware running recent versions of Windows, Mac OS X, or Linux.
50 gigabytes of free disk space, accessible at a minimum read/write speed of 100 MB/s.
2 gigabytes of memory (RAM)
A broadband Internet connection with upload speeds of at least 400 kilobits (50 kilobytes) per second
An unmetered connection, a connection with high upload limits, or a connection you regularly monitor to ensure it doesn’t exceed its upload limits.
6 hours a day that your full node can be left running. (You can do other things with your computer while running a full node.) More hours would be better, and best of all would be if you can run your node continuously.
Note: many operating systems today (Windows, Mac, and Linux) enter a low-power mode after the screensaver activates, slowing or halting network traffic. This is often the default setting on laptops and on all Mac OS X laptops and desktops. Check your screensaver settings and disable automatic “sleep” or “suspend” options to ensure you support the network whenever your computer is running.
Possible Problems
Legal: Dogecoin use is prohibited or restricted in some areas.
Bandwidth limits: Some Internet plans will charge an additional amount for any excess upload bandwidth used that isn’t included in the plan. Worse, some providers may terminate your connection without warning because of overuse. We advise that you check whether your Internet connection is subjected to such limitations and monitor your bandwidth use so that you can stop Dogecoin Core before you reach your upload limit.
Anti-virus: Several people have placed parts of known computer viruses in the Dogecoin block chain. This block chain data can’t infect your computer, but some anti-virus programs quarantine the data anyway, making it more difficult to run Dogecoin Core. This problem mostly affects computers running Windows.
Attack target: Dogecoin Core powers the Dogecoin peer-to-peer network, so people who want to disrupt the network may attack Dogecoin Core users in ways that will affect other things you do with your computer, such as an attack that limits your available download bandwidth.
Initial Block Download (IBD)
Initial block download refers to the process where nodes synchronize themselves to the network by downloading blocks that are new to them. This will happen when a node is far behind the tip of the best block chain. In the process of IBD, a node does not accept incoming transactions nor request mempool transactions.
If you are trying to set up a new node following the instructions below, you will go through the IBD process at the first run, and it may take a considerable amount of time since a new node has to download the entire block chain (which is roughly 50 gigabytes now). During the download, there could be a high usage for the network and CPU (since the node has to verify the blocks downloaded), and the client will take up an increasing amount of storage space (reduce storage provides more details on reducing storage).
Before the node finishes IBD, you will not be able to see a new transaction related to your account until the client has caught up to the block containing that transaction. So your wallet may not count new payments/spendings into the balance.
If you are using Dogecoin Core GUI, you can monitor the progress of IBD in the status bar (left bottom corner).
Linux Instructions
The following instructions describe installing Dogecoin Core using tools available in most mainstream Linux distributions. We assume you use a Bourne-like shell such as bash.
Using any computer, go to the Dogecoin Core download page. Choose the appropriate file for your Linux install (either 32-bit or 64-bit) and download the file. If necessary, move the file to the computer you want to use to run Dogecoin Core.
If you aren’t already logged into the computer you want to install Dogecoin on, login now. Make sure you use an account that can use su or sudo to install software into directories owned by the root user.
If you logged in graphically, start a terminal. If you logged in another way, we will assume you’re already in a shell.
Locate the file you downloaded and extract it using the tar command followed by the argument xzf followed by the file name. The argument xzf means eXtract the gZipped tar archive File. For example, for a 64-bit tar archive in your current directory, the command is:
tar xzf dogecoin-1.14.3-x86_64-linux-gnu.tar.gz
This will create the directory dogecoin-1.14.3 within your current working directory. We will install the contents of its bin subdirectory into the /usr/local/bin directory using the the install command. The install command is part of the GNU coreutils available on nearly every Linux distribution, and the /usr/local/bin directory is a standard location for self-installed executables (you may edit the commands below to use a different location).
If you use sudo to run commands as root, use the following command line:
To use Dogecoin Core Graphical User Interface (GUI), proceed to the Dogecoin Core GUI section below.
To use the Dogecoin Core daemon (Dogecoind), which is useful for programmers and advanced users, proceed to the Dogecoin Core Daemon section below.
To use both the GUI and the daemon, read both the GUI instructions and the daemon instructions. Note that you can’t run both the GUI and the daemon at the same time using the same configuration directory.
Dogecoin Core GUI
In order to use Dogecoin Core GUI, you will need several libraries installed. All of them should be available in all major recently-released Linux distributions, but they may not be installed on your computer yet. To determine whether you’re missing any libraries, open a terminal (if you haven’t already) and run the command /usr/local/bin/dogecoin-qt to start Dogecoin Core GUI.
If all the required libraries are installed, Dogecoin Core will start. If a required library is missing, an error message similar to the following message will be displayed:
/usr/local/bin/dogecoin-qt: error while loading shared libraries: libQtGui.so.4: cannot open shared object file: No such file or directory
Search your distribution’s package database for the missing file missing and install package containing that file. Then re-run /usr/local/bin/dogecoin-qt to see if it’s missing another file. Repeat until Dogecoin Core GUI starts.
You will be prompted to choose a directory to store the Dogecoin block chain and your wallet. Unless you have a separate partition or drive you want to use, click Ok to use the default.
Dogecoin Core GUI will begin to download the block chain. This step will take at least several days, and it may take much more time on a slow Internet connection or with a slow computer. During the download, Dogecoin Core will use a significant part of your connection bandwidth. You can stop Dogecoin Core at any time by closing it; it will resume from the point where it stopped the next time you start it.
After download is complete, you may use Dogecoin Core as your wallet or you can just let it run to help support the Dogecoin network.
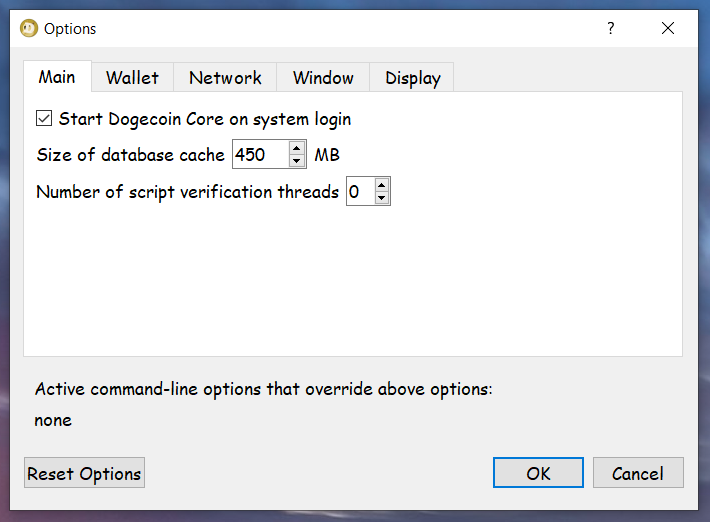
Optional: Start Your Node At Login
Starting your node automatically each time you login to your computer makes it easy for you to contribute to the network. The easiest way to do this is to tell Dogecoin Core GUI to start at login. This only works in desktop environments that support the autostart specification, such as Gnome, KDE, and Unity.
While running Dogecoin Core GUI, open the Settings menu and choose Options. On the Main tab, click Start Dogecoin on system login. Click the Ok button to save the new settings.
The next time you login to your desktop, Dogecoin Core GUI should be automatically started as an icon in the tray.
If Dogecoin Core GUI does not automatically start, you may need to add it to an .xinit or .xsession file as described here.
You have now completed installing Dogecoin Core.
To support the Dogecoin network, you also need to allow incoming connections. Please read the Network Configuration section for details.
Dogecoin Core Daemon
If you’re logged in as an administrative user with sudo access, you may log out. The steps in this section should be performed as the user you want to run Dogecoin Core. (This can be a locked account used only by Dogecoin Core.)
Type the following command:
dogecoind -daemon
It will print a message that Dogecoin Core is starting. To interact with Dogecoin Core daemon, you will use the command dogecoin-cli (Dogecoin command line interface).
Note: it may take up to several minutes for Dogecoin Core to start, during which it will display the following message whenever you use dogecoin-cli:
After it starts, you may find the following commands useful for basic interaction with your node: getblockchaininfo, getnetworkinfo, getnettotals, getwalletinfo, stop, and help.
For example, to safely stop your node, run the following command:
dogecoin-cli stop
When Dogecoin Core daemon first starts, it will begin to download the block chain. This step will take at least several days, and it may take much more time on a slow Internet connection or with a slow computer. During the download, Dogecoin Core will use a significant part of your connection bandwidth. You can stop Dogecoin Core at any time using the stop command; it will resume from the point where it stopped the next time you start it.
Optional: Start Your Node At Boot
Starting your node automatically each time your computer boots makes it easy for you to contribute to the network. The easiest way to do this is to start Dogecoin Core daemon from your crontab. To edit your crontab on most distributions, run the following command:
crontab -e
Scroll to the bottom of the file displayed and add the following line:
@reboot dogecoind -daemon
Save the file and exit; the updated crontab file will be installed for you. On most distributions, this will cause Dogecoin Core daemon to be automatically started each time your reboot your computer.
After downloading the file to your desktop or your Downloads folder (C:\Users\<YOUR USER NAME>\Downloads), run it by double-clicking its icon. Windows will ask you to confirm that you want to run it. Click Yes and the Dogecoin installer will start. It’s a typical Windows installer, and it will guide you through the decisions you need to make about where to install Dogecoin Core.
To continue, choose one of the following options
If you want to use the Dogecoin Core Graphical User Interface (GUI), proceed to the Dogecoin Core GUI section below.
If you want to use the Dogecoin Core daemon (Dogecoind), which is useful for programmers and advanced users, proceed to the Dogecoin Core Daemon section below.
If you want to use both the GUI and the daemon, read both the GUI instructions and the daemon instructions. Note that you can’t run both the GUI and the daemon at the same time using the same configuration directory.
Windows 10 Dogecoin Core GUI
Press the Windows key and start typing “Dogecoin”. When the Dogecoin Core icon appears (as shown below), click on it.
You will be prompted to choose a directory to store the Dogecoin block chain and your wallet. Unless you have a separate partition or drive you want to use, click Ok to use the default.
Your firewall may block Dogecoin Core from making outbound connections. It’s safe to allow Dogecoin Core to use all networks. (Note: you will still need to configure inbound connections as described later in the Network Configuration section.)
Dogecoin Core GUI will begin to download the block chain. This step will take at least several days, and it may take much more time on a slow Internet connection or with a slow computer. During the download, Dogecoin Core will use a significant part of your connection bandwidth. You can stop Dogecoin Core at any time by closing it; it will resume from the point where it stopped the next time you start it.
After download is complete, you may use Dogecoin Core as your wallet or you can just let it run to help support the Dogecoin network.
Optional: Start Your Node At Login
Starting your node automatically each time you login to your computer makes it easy for you to contribute to the network. The easiest way to do this is to tell Dogecoin Core GUI to start at login.
While running Dogecoin Core GUI, open the Settings menu and choose Options. On the Main tab, click Start Dogecoin on system login. Click the Ok button to save the new settings.
The next time you login to your desktop, Dogecoin Core GUI will be automatically started minimized in the task bar.
Warning: to prevent data corruption, do not force shutdown of your computer from the Windows shutdown screen when you have Dogecoin Core running.
You have now completed installing Dogecoin Core.
To support the Dogecoin network, you also need to allow incoming connections. Please read the Network Configuration section for details.
Windows 10 Dogecoin Core Daemon
To start Dogecoin Core daemon, first open a command window: press the Windows key and type “cmd”. Choose the option labeled “Command Prompt”.
If you installed Dogecoin Core into the default directory, type the following at the command prompt:
C:\Program Files\Dogecoin\daemon\dogecoind
Dogecoin Core daemon should start. To interact with Dogecoin Core daemon, you will use the command dogecoin-cli (Dogecoin command line interface). If you installed Dogecoin Core into the default location, type the following at the command prompt to see whether it works:
After it starts, you may find the following commands useful for basic interaction with your node: getblockchaininfo, getnetworkinfo, getnettotals, getwalletinfo, stop, and help.
For example, to safely stop your node, run the following command:
When Dogecoin Core daemon first starts, it will begin to download the block chain. This step will take at least several days, and it may take much more time on a slow Internet connection or with a slow computer. During the download, Dogecoin Core will use a significant part of your connection bandwidth. You can stop Dogecoin Core at any time using the stop command; it will resume from the point where it stopped the next time you start it.
Optional: Start Your Node At Boot
Starting your node automatically each time your computer boots makes it easy for you to contribute to the network. The easiest way to do this is to start Dogecoin Core daemon when you login to your computer.
Right-click on the File Explorer window and choose New, then Text file. Name the file start_dogecoind.bat. Then right-click on it and choose Open in Notepad (or whatever editor you prefer). Copy and paste the following line into the file.
C:\Program Files\Dogecoin\daemon\dogecoind
(If you installed Dogecoin Core in a non-default directory, use that directory path instead.)
Save the file. The next time you login to your computer, Dogecoin Core daemon will be automatically started.
Warning: to prevent data corruption, do not force shutdown of your computer from the Windows shutdown screen when you have Dogecoin Core running.
You have now completed installing Dogecoin Core.
To support the Dogecoin network, you also need to allow incoming connections. Please read the Network Configuration section for details.
After downloading the file to your Downloads folder (/Users/<YOUR USER NAME>/Downloads), run it by double-clicking its icon. OS X will open a Finder window for you to drag Dogecoin Core to your Applications folder.
Mac OS X Dogecoin Core GUI
The first time running Dogecoin Core, Max OS X will ask you to confirm that you want to run it.
You will be prompted to choose a directory to store the Dogecoin block chain and your wallet. Unless you have a separate partition or drive you want to use, click Ok to use the default.
Dogecoin Core GUI will begin to download the block chain. This step will take at least several days, and it may take much more time on a slow Internet connection or with a slow computer. During the download, Dogecoin Core will use a significant part of your connection bandwidth. You can stop Dogecoin Core at any time by closing it; it will resume from the point where it stopped the next time you start it.
After download is complete, you may use Dogecoin Core as your wallet or you can just let it run to help support the Dogecoin network.
Optional: Start Your Node At Login
Starting your node automatically each time you login to your computer makes it easy for you to contribute to the network. The easiest way to do this is to tell Dogecoin Core GUI to start at login.
While running Dogecoin Core GUI, open the Dogecoin Core menu and choose Preferences. On the Main tab, click Start Dogecoin on system login. Click the Ok button to save the new settings.
The next time you login to your desktop, Dogecoin Core GUI will be automatically started minimized in the task bar.
You have now completed installing Dogecoin Core.
To support the Dogecoin network, you also need to allow incoming connections. Please read the Network Configuration section for details.
Upgrading Dogecoin Core
If you are running an older version, shut it down. Wait until it has completely shut down (which might take a few minutes for older versions), then run the installer (on Windows) or just copy over /Applications/Dogecoin-Qt (on Mac) or dogecoind/dogecoin-qt (on Linux).
The blockchain and wallet files in the data directory are compatible between versions so there is no requirement to make any changes to the data directory when upgrading. Occasionally the format of those files changes, but the new Dogecoin Core version will include code that automatically upgrades the files to the new format so no manual intervention is required.
Sometimes upgrade of the blockchain data files from very old versions to the new versions is not supported. In those cases it may be necessary to redownload the blockchain. Check the release notes of the new version if you are planning to upgrade from a very old version.
Sometimes downgrade is not possible because of changes to the data files. Again, check the release notes for the new version if you are planning to downgrade.
Network Configuration
If you want to support the Dogecoin network, you must allow inbound connections.
When Dogecoin Core starts, it establishes 8 outbound connections to other full nodes so it can download the latest blocks and transactions. If you just want to use your full node as a wallet, you don’t need more than these 8 connections—but if you want to support lightweight clients and other full nodes on the network, you must allow inbound connections.
Servers connected directly to the Internet usually don’t require any special configuration. You can use the testing instructions below to confirm your server-based node accepts inbound connections.
Home connections are usually filtered by a router or modem. Dogecoin Core will request your router automatically configure itself to allow inbound connections to Dogecoin’s port, port 22556. Unfortunately many routers don’t allow automatic configuration, so you must manually configure your router. You may also need to configure your firewall to allow inbound connections to port 22556. Please see the following subsections for details.
Testing Connections
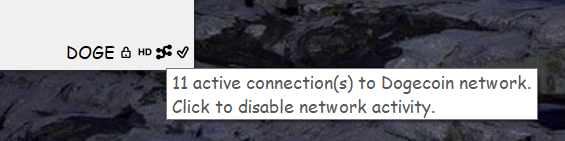
For confirmation that you accept inbound connections, you can use Dogecoin Core. Dogecoin Core can’t tell you directly whether you allow inbound connections, but it can tell you whether or not you currently have any inbound connections. If your node has been online for at least 30 minutes, it should normally have inbound connections. If want to check your peer info using Dogecoin Core, choose the appropriate instructions below:
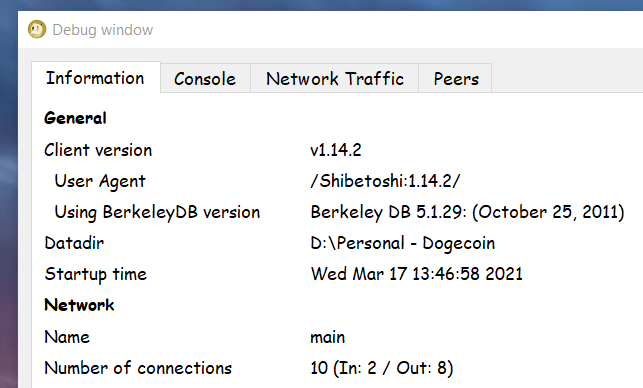
In the bottom right corner of the Dogecoin Core GUI are several icons. If you hover over the network nodes icon, it will tell you how many connections you have. The icon won’t be fully filled in until you have more than 8 active connections, which only happens if inbound connections are allowed.
For confirmation, you can go to the Help menu, choose Debug Window, and open the Information tab. In the Network section, it will tell you exactly how many inbound connections you have. If the number is greater than zero, then inbound connections are allowed.
The getconnectioncount command will tell you how many connections you have. If you have more than 8 connections, inbound connections are allowed. For example:
$ dogecoin-cli getconnectioncount
10
For confirmation, you can use the getpeerinfo command to get information about all of your peers. Each peer’s details will include an inbound field set to true if the connection is inbound. If you have any inbound connections, then inbound connections are allowed.
If Dogecoin Core can’t automatically configure your router to open port 22556, you will need to manually configure your router. We’ve tried to make the following instructions generic enough to cover most router models; if you need specific help with your router, please ask for help on a tech support site such as SuperUser.
Enabling inbound connections requires two steps, plus an extra third step for firewall users:
Giving your computer a static (unchanging) internal IP address by configuring the Dynamic Host Configuration Protocol (DHCP) on your router.
Forwarding inbound connections from the Internet through your router to your computer where Dogecoin Core can process them.
Configuring your firewall to allow inbound connections. This step mainly applies to Windows users, as Mac OS X and most Linuxes do not enable a firewall by default.
Configuring DHCP
In order for your router to direct incoming port 22556 connections to your computer, it needs to know your computer’s internal IP address. However, routers usually give computers dynamic IP addresses that change frequently, so we need to ensure your router always gives your computer the same internal IP address.
Start by logging into your router’s administration interface. Most routers can be configured using one of the following URLs, so keep clicking links until you find one that works. If none work, consult your router’s manual.
Upon connecting, you will probably be prompted for a username and password. If you configured a password, enter it now. If not, the Router Passwords site provides a database of known default username and password pairs.
After logging in, you want to search your router’s menus for options related to DHCP, the Dynamic Host Configuration Protocol. These options may also be called Address Reservation.
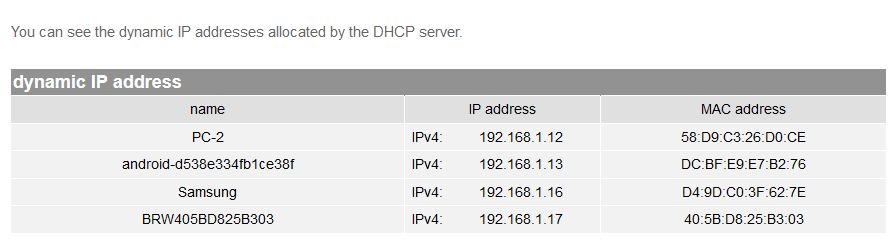
In the reservation configuration, some routers will display a list of computers and devices currently connected to your network, and then let you select a device to make its current IP address permanent:
If that’s the case, find the computer running Dogecoin Core in the list, select it, and add it to the list of reserved addresses. Make a note of its current IP address—we’ll use the address in the next section.
Other routers require a more manual configuration. For these routers, you will need to look up the fixed address (MAC address) for your computer’s network card and add it to the list. This operation differs by operating system:
Windows 7 & 8: Press Win-R (Windows key plus the R key) to open the Run dialog. Type cmd to open the console. Type ipconfig /all and find the result that best matches your connection—usually a wireless connection. Look for a line that starts with “Physical Address” and contains a value like this:Physical Address. . . . . . . . . : 01-23-45-67-89-AB
Replace all the dashes with colons, so the address looks like this: 01:23:45:67:89:AB. Use that address in the instructions below.
Linux: open a terminal and type ifconfig. Find the result that best matches your connection—a result starting with wlan indicates a wireless connection. Find the field that starts with HWaddr and copy the immediately following field that looks like 01:23:45:67:89:ab. Use that value in the instructions below.
Mac OS X: open a terminal and type ifconfig. Find the result that best matches your connection—a result starting with en1 usually indicates a wireless connection. Find the field that starts with ether: and copy the immediately following field that looks like 01:23:45:67:89:ab. Use that value in the instructions below.
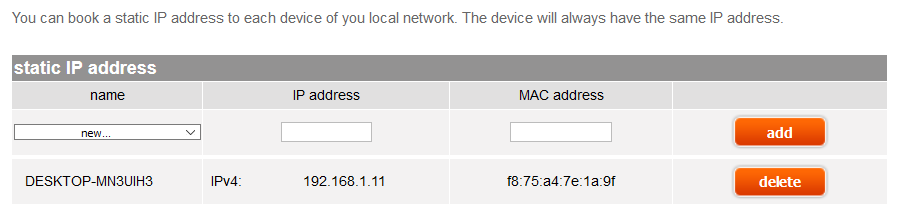
Once you have the MAC address, you can fill it into to your router’s manual DHCP assignment table, as illustrated below. Also choose an IP address and make a note of it for the instructions in the next subsection. After entering this information, click the Add or Save button.
Then reboot your computer to ensure it gets assigned the address you selected and proceed to the Port Forwarding instructions below.
Port Forwarding
For this step, you need to know the local IP address of the computer running Dogecoin Core. You should have this information from configuring the DHCP assignment table in the subsection above.
Login to your router using the same steps described near the top of the DHCP subsection. Look for an option called Port Forwarding, Port Assignment, or anything with “Port” in its name. On some routers, this option is buried in an Applications & Gaming menu.
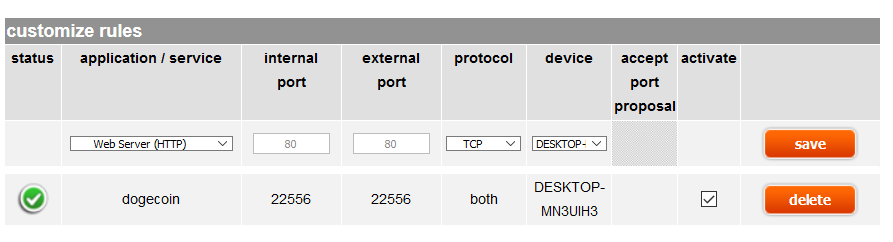
The port forwarding settings should allow you to map an external port on your router to the “internal port” of a device on your network as shown in the screenshot below.
Both the external port and the internal port should be 22556 for Dogecoin. Make sure the IP address you enter is the same one you configured in the previous subsection.
After filling in the details for the mapping, save the entry. You should not need to restart anything. Start Dogecoin Core (if you haven’t already) and follow the Testing Connections instructions to test your connection.
If you still can’t connect and you use a firewall, you probably need to change your firewall settings. See the Firewall section below.
If something else went wrong, it’s probably a problem with your router configuration. Re-read the instructions above to see if you missed anything, search the web for help with “port forwarding”, and ask for help on sites like SuperUser.
We can’t provide direct support, but if you see a way to improve these instructions, please open an issue.
Firewall Configuration
Firewalls block inbound connections. To use Dogecoin, you need to configure your computer’s firewall to allow connections to port 22556. This is usually as easy as starting your firewall configuration software and defining a new rule to allow inbound connections to port 22556. For additional information for Windows, see the links below:
Mac OS X comes with its firewall disabled by default, but if you have enabled it, see the section Allowing Specific Applications from the official Apple guide.
Ubuntu also comes with its firewall disabled by default, but if you have enabled it, see the Ubuntu wiki page for information about adding port forwarding rules.
Once you have allowed inbound connections to port 22556, start Dogecoin Core (if you haven’t already) and follow the Testing Connections instructions to test your connection.
If something else went wrong re-read the DHCP, port forwarding, and firewall instructions above to see if you missed anything, search the web for help with “port forwarding” and “opening firewall ports”, and ask for help on sites like SuperUser.
We can’t provide direct support, but if you see a way to improve these instructions, please open an issue.
Configuration Tuning
This section contains advice about how to change your Dogecoin Core configuration to adapt it to your needs.
There are two ways to change your configuration. The first is to start Dogecoin Core with the options you want. For example, if you want to limit it to using one CPU core for signature verification, you can start Dogecoin Core like this:
Once you’ve decided you like an option, you can add it to the Dogecoin Core configuration file. You can find that file in the following directories:
Windows: %APPDATA%\Dogecoin\
OSX: \$HOME/Library/Application Support/Dogecoin/
Linux: \$HOME/.dogecoin/
To add an option to the configuration file, just remove its leading dash. You may also need to remove any quotation marks you used in your shell. For example, the -par option seen above would look like this in the configuration file:
par=1
If you have any questions about configuring Dogecoin Core, please stop by our subredd
Reduce Storage
It is possible to configure your node to to run in pruned mode in order to reduce storage requirements. This can reduce the disk usage from over 50GB to around 5GB.
Running a node in pruned mode is incompatible with -txindex and -rescan. It also disables the RPC importwallet. Two RPCs that are available and potentially helpful, however, are importprunedfunds and removeprunedfunds.
To enable block pruning set prune=N on the command line or in dogecoin.conf, where N is the number of MiB to allot for raw block and undo data.
A value of 0 disables pruning. The minimal value above 0 is 550. Your wallet is as secure with high values as it is with low ones. Higher values merely ensure that your node will not shut down upon blockchain reorganizations of more than 2 days – which are unlikely to happen in practice. In future releases, a higher value may also help the network as a whole because stored blocks could be served to other nodes.
Reduce Traffic
Some node operators need to deal with bandwidth caps imposed by their ISPs.
By default, Dogecoin Core allows up to 125 connections to different peers, 8 of which are outbound. You can therefore have at most 117 inbound connections.
The default settings can result in relatively significant traffic consumption.
Ways to reduce traffic:
Maximum Upload Targets
-maxuploadtarget=<MiB per day>
A major component of the traffic is caused by serving historic blocks to other nodes during the initial blocks download phase (syncing up a new node). This option can be specified in MiB per day and is turned off by default. This is not a hard limit; only a threshold to minimize the outbound traffic. When the limit is about to be reached, the uploaded data is cut by no longer serving historic blocks (blocks older than one week). Keep in mind that new nodes require other nodes that are willing to serve historic blocks. The recommended minimum is 144 blocks per day (max. 144MiB per day)
Disable listening
-listen=0
Disabling listening will result in fewer nodes connected (remember the maximum of 8 outbound peers). Fewer nodes will result in less traffic usage as you are relaying blocks and transactions to fewer nodes.
Reduce maximum connections
-maxconnections=<num>
Reducing the maximum connected nodes to a minimum could be desirable if traffic limits are tiny. Keep in mind that Dogecoin’s trustless model works best if you are connected to a handful of nodes.
Blocks-only mode
-blocksonly
Causes your node to stop requesting and relaying transactions unless they are part of a block and also disables listening as described above.
This reduces your node’s bandwidth to the absolute minimum necessary to stay synchronized with the network, about 150 megabytes incoming data per day and about 1 megabyte of outgoing data per day, but it does mean that your node won’t see incoming transactions until they’ve received at least one confirmation.
You will still be able to send transactions from the built-in wallet or from peers you’ve whitelisted using the -whitelist parameter.
The price of Dogecoin has now reached a critical juncture. The present price action and volume suggest that the next few days might make or break the dog-themed meme coin.
If the Dogecoin price falls below $0.155, it may go as low as $0.08. On the other side, Elon Musk’s recent remark may inspire bulls to buy Dogecoin at present levels, causing its price to rise to more than $0.21.
Dogecoin is now trading at $0.191, slightly above its key support level of $0.16. This price point is critical for Dogecoin since it has kept the coin from falling precipitously four times in the last year. Since a result, both bulls and bears should be exceedingly careful, as a higher than 50% correction might occur at any time.
EverGrow Coin is another initiative that might make a splash in 2022. EverGrow holders have already earned their part of more over $30 million in prizes, a record-breaking success for such a small initiative. EverGrow plans to provide a suite of utilities in 2022, including an Exchange and Crypto Wallet, an NFT Marketplace and Lending platform, Oracle-based Play to Earn games, and a content production platform. These utilities will play a significant role in providing’rewards’ to EGC holders in the form of Binance pegged USD, a regulated stablecoin.
Analysts predicted that if EverGrow’s daily volume surpasses $30 million. Based on the current market valuation of $300 million, anyone investing $10,000 today would earn $750 every day. EverGrow is now available for purchase on a number of decentralized exchanges based on the Binance chain.
Dogecoin Price Analysis
Over the course of 2021, we can see that there is a significant difference between $0,16 and $0,086 and $0,078 and that Dogecoin’s point of control (POC) is at $0,052. This indicates that the trading volume of Dogecoin at that price was the biggest this year. As a result, the Dogecoin estimate is supported not just by volume data but also by technological data.
Then there’s Elon Musk’s December 14th tweet to consider. This certainly led bulls to intensify purchasing pressure, resulting in a more than 40% gain in the Dogecoin price. It almost appears as though Elon intentionally selected this precise moment to tweet, since he rescued Dogecoin from collapsing. The only thing he had to do to save Doge from losing half its value was to suggest Tesla will make certain products available for purchase using Dogecoin.
As of now, Dogecoin holders are in the clear with a price of $0,172, but if the day finishes below $0,16, this might signal the beginning of a decline to $0,12, and even even lower to $0,085. When we look at on-chain measurements, we cannot help but corroborate this likely situation. Data reveals that there is very little support all the way down to $0,074, which is significantly lower than the technical anticipated target level.
At current pricing, there are around 285,000 wallet addresses that have purchased more than 2.5 billion Dogecoin “in the money,” and they will most likely buy some more tokens to attempt to keep their winnings. On the Dogecoin blockchain, we also notice a decrease in on-chain trade volume. This might be due to the relatively recent tokens such as Shiba Inu, Solana Dogecoin, and other dog-themed humor currencies.
On the other hand, if Bitcoin rises in price over the next several hours, dragging Dogecoin with it, the bulls may obtain a support floor above $0,18. If this scenario plays out, our bearish thesis will be invalidated, and Dogecoin might end up at $0,215 by the end of the day.
Tesla CEO Elon Musk believes that even though Dogecoin was created as a silly joke, it is much better suited for transactions than Bitcoin. In a recent interview with TIME magazine, after being named TIME’s Person of the year, he said, “Fundamentally, Bitcoin is not a good substitute for transactional currency.”
Musk said: “The transaction value of Bitcoin is low and the cost per transaction is high. At least at a space level, it is suitable as a store of value. But fundamentally, Bitcoin is not a good substitute for transactional currency.”
“The total transaction flow that you do with Dogecoin in transactions per day has a much higher potential than Bitcoin,” he added
Musk has been a frequent proponent of the meme currency and has helped to boost its popularity significantly through his tweets. Dogecoin had spiked over 20 percent earlier this week to over $0.21 after Musk announced that the electric car manufacturing company will start accepting it for various merchandise it plans to sell. “Tesla will make some merch buyable with Doge and see how it goes,” Musk tweeted.
However, he did not specify what merchandise will be sold for dogecoins. Tesla sells many novelty items like belt buckles, miniature models of its vehicles. The company recently unveiled a limited edition’ cyber whistle’, a miniature replica of the much-awaited Cybertruck. These items start from $50 and can go as high as $1,900. According to data from Coinmarketcap, Dogecoin has risen by nearly 6,000 percent over the last year. Co-founder of the Bitcoin IRA has said, “Elon Musk has been an advocate for the crypto community for many years. His latest announcement will usher in a new era of commerce and trailblaze a path for altcoins to expand their use case.” Musk has been a supporter of transitioning cryptocurrencies into the traditional financial market for years. But when it comes to his favourite cryptocurrency, it has always been dogecoin. Musk has 66 million followers on Twitter and often uses his influence on the site to show support for his favourite cryptocurrency. A tweet from Musk can send the prices of the meme-inspired crypto coin soaring, and in some cases, even tumbling, as it did when he called it a ‘hustle’ during his guest-host spot on the “Saturday Night Live” comedy TV show in May.
I’m trying to recover some dogecoins from a former Doughwallet instance. Obviously Doughwallet doesn’t exist anymore, but I still have the backup seed (the 12 word mnemonic).
I only ever did two transactions and used only two addresses. The fist tx was to my Doughwallet, to the first address. The second tx was from my Doughwallet, sending part of my balance to someone else, and the change was obviously returned to the next address in my Doughwallet. My DOGE are still on that 2nd address.
When entering my backup phrase, it generates the first 20 addresses. Now here’s the strange thing, the first address is correct. It is the first address where my dogecoins were originally sent to. So this asserts that my backup phrase is correct. However the second address is different. The address where my remaining dogecoins were sent (as change, within Doughwallet) is not in that list. I have even tried and generate more rows, up to 1000, but the address is not there.
I’m 100% certain that this 2nd address was automatically generated by my Doughwallet, as the next address in line to hold my change.
Any idea what’s going on?
Upon doing some more investigation, I noticed a difference between the Doughwallet recovery script and other mnemonic HD address generator scripts. To reproduce this:
the meme token was ranked 4th in the News section. In this section, the 10th position was taken by a request for the Ethereum price.
Google Trends has published a list of the most popular searches in 2021, in which the query “Dogecoin” was ranked 4th in the “News” section. Also, in the section News section, the 10th position was taken by the request “Ethereum price.” The first place went to Afghanistan, AMC Stock was ranked second, and “COVID” Vaccine was ranked third.
In May 2021, interest in DOGE among search engine users for the first time exceeded the volume of requests for Bitcoin. According to the service schedule, in the first half of the year, interest in the “meme” token correlated with requests for the first and leading cryptocurrency. However, already in the second half of 2021, the interest of Google users in Dogecoin (DOGE) began to exceed the volume of requests for Bitcoin.
On December 9, Dogecoin was trading at $0.1731. Over the week, DOGE lost 20% in price, and its capitalization fell to $ 23 billion, according to CoinGecko. The asset ranks 11th in the list of the largest cryptocurrencies in terms of capitalization.
I’ve seen hundreds of posts on this subreddit over the last few years dealing with Doughwallet. I’m sure that, like me, people sent off their coins to their nice iOS wallet, forgot about it, and that was that.
Funnily enough, I found two recovery phrases on my iPhone – one a screenshot, one in my notes. So I decided to see what, if anything, could be recovered.
The problem with Doughwallet, and its recovery tool, is that it generates thousands and thousands of wallet/private key combos. Instead of manually inputting every wallet onto a block explorer to check for balances, I decided to try MultiDoge.
This seems to be the only way to mass import keys. It’s quite simple actually.
1: Open it up, go to the default wallet, export the private keys for this wallet into a .key file. It will only have 1 private key in it.
2: Generate the private keys from your recovery tool. I used 1000, but it could go much, much higher. Toggle the wallet addresses and path off for easy selection and copying of private keys.
3: Open up the .key file in Notepad++ or something similar. You’ll see a lot of commented-out lines and one uncommented line with your private key and a timestamp. Past the private keys you have generated from the tool just below the one private key in the .key file. They will indent but don’t worry, Multidoge will look past this.
4: Import the .key file into Multidoge.
Now this is where my method fails. Multidoge will take a while to do this, and be warned – because we have removed the timestamp, Multidoge will want to rescan the entire blockchain. My internet ain’t great, and I doubt there is a nearby node in my country, thus Multidoge doesn’t pick up any peers and doesn’t scan.
Please, if someone can come up with a genius idea of how to get Multidoge to “skim” the core network properly, after which I can transfer my doges to a better wallet solution, I would be forever thankful. I’m thinking of running a full node on an EC2 instance and then directly adding it as a node under multidoge’s settings. But we’ll see.
If this method worked for you, let me know. I’d love to know that at least someone got something out of this ramble.
tl;dr Multidoge allows bulk import of private keys from the Doughwallet recovery tool and may recover some doges you may had.